How to set the ollama model location within docker container?
Solution:
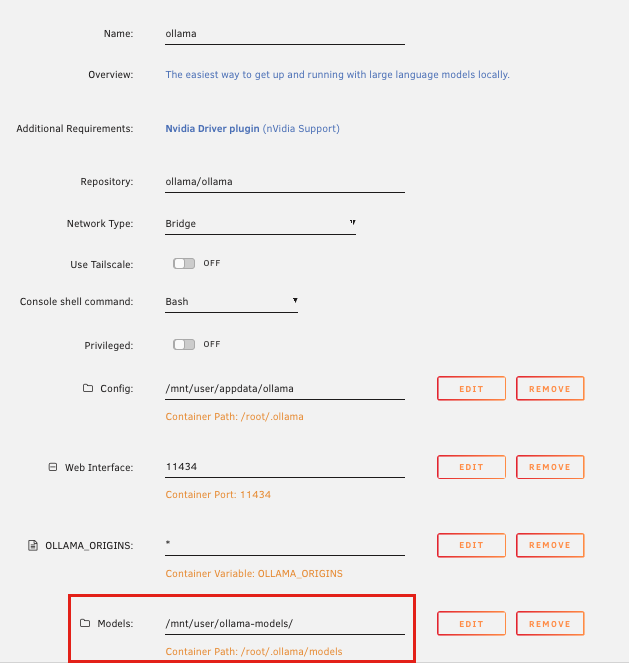
1. Create a new share outside appdata 2. Add a new container path to unraid template as shown below:
** The key was the container path: /root/.ollama/models
To set the model location for the Ollama Docker container on Unraid, you need to
configure the path mapping (also known as a volume mount) in the container’s settings. This tells Docker to save the models to a specific location on your Unraid server instead of inside the container itself.
The basic concept
By default, the Ollama Docker container stores models inside its own file system at /root/.ollama. Your goal is to map this internal container path to a specific folder on your Unraid array, such as /mnt/user/appdata/ollama/.
How to set the model path in Unraid
Access the Docker tab. In the Unraid web interface, navigate to the Docker tab.
Add or edit the Ollama container.
If installing for the first time: Go to the Apps tab, search for Ollama, and click Install.
If Ollama is already installed: Click the Ollama container icon and select Edit.
Configure the path variable. Scroll down to the Path section in the container settings.
Add a new path mapping. You need to create an entry with the following details:
Name: A descriptive name like ollama-models.
Container Path: /root/.ollama. This is the internal directory where Ollama stores its models.
Host Path: The directory on your Unraid server where you want to store the model data. For example, /mnt/user/appdata/ollama/.
Apply the changes. Click Apply to save the new container configuration. If you’re editing an existing container, it will be recreated with the new settings.
Pull a model. After the container restarts, use the Ollama command line to download a model. For example, to download the Llama 3 model, open a terminal (or use the web UI) and run ollama pull llama3. The downloaded model data will now be saved to the host path you specified.
What to do with existing models
If you have already downloaded models that are saved inside the old Docker volume, you will need to migrate them.
Stop the Ollama container in Unraid.
Copy the models: Access your Unraid console or use a file manager to move the files from the original volume to your newly mapped host path. The default, unmapped volume location is typically found in /mnt/user/docker/volumes/ollama/_data/.
Start the container. Restart the Ollama container. It will now use the models from the new location.
Remove the old volume: Once you confirm the models are working from the new location, you can delete the old Docker volume to reclaim disk space.
Based in the docker run command and the container logs, the issue is that you are not instructing Ollama to use your custom model directory. The container’s internal configuration, as shown in the logs, still points to the default location, even though you have mapped two volumes.
The problem with your docker run command
You have configured two volumes, but Ollama only uses one.
-v '/mnt/user/appdata/ollama':'/root/.ollama':'rw': This correctly maps Ollama’s configuration files.
-v '/mnt/user/ollama-models/':'/Models':'rw': This maps your intended model storage directory to /Modelsinside the container, but Ollama does not know to look there.
The log clearly shows OLLAMA_MODELS:/root/.ollama/models, indicating that the Ollama process is still looking for models in its default directory, not /Models.
The correct fix: Set the OLLAMA_MODELS environment variable
You need to add an environment variable to your docker run command that explicitly tells the Ollama process where the models should be saved.
Stop the current Ollama container in your Unraid web UI.
Add the environment variable to your docker run command. You can do this by adding -e 'OLLAMA_MODELS'='/Models' before the final image name.
Ensure your paths are correctly mapped. You only need a single volume mount to handle both the configuration and the models. A simpler and more common approach is to map the entire ~/.ollama directory.
Corrected docker run command for a unified path
This is a cleaner approach that avoids confusion by keeping all Ollama data in one mapped directory.
The volume -v '/mnt/user/appdata/ollama':'/root/.ollama':'rw' maps the container’s default data directory (/root/.ollama) directly to your Unraid appdata share (/mnt/user/appdata/ollama).
The OLLAMA_MODELS environment variable is not needed, as Ollama will correctly use the models subdirectory within the /root/.ollama volume.
Corrected docker run command for a separate model path
If you want to stick with your original two-path approach, you must add the environment variable.
OLLAMA_MODELS='/Models': Explicitly tells Ollama to look for models in the /Models directory inside the container.
-v '/mnt/user/ollama-models':'/Models':'rw': Correctly maps the host path to the new container path.
Final steps
After making these changes:
:/Models# ls -la total 0 drwxrwxrwx 1 99 users 6 Oct 19 18:17 . drwxr-xr-x 1 root root 164 Oct 19 18:19 .. root@765a0a3f364d:/Models# ollama list NAME ID SIZE MODIFIED llama3:instruct 365c0bd3c000 4.7 GB 1 second ago nomic-embed-text:latest 0a109f422b47 274 MB 3 minutes ago /Models does not link to /root/.ollama/models root@765a0a3f364d:/# ls -la total 16 drwxr-xr-x 1 root root 164 Oct 19 18:19 . drwxr-xr-x 1 root root 164 Oct 19 18:19 .. -rwxr-xr-x 1 root root 0 Oct 19 18:19 .dockerenv drwxrwxrwx 1 99 users 6 Oct 19 18:17 Models lrwxrwxrwx 1 root root 7 Apr 22 2024 bin -> usr/bin
The core problem is that you are attempting to map two separate paths for Ollama’s data, but you’re not correctly telling the Ollama service inside the container where to look for models
Even with the volume -v '/mnt/user/ollama-models/':'/Models':'rw', the Ollama application is still reading its configuration and model manifest data from its default location inside the container, /root/.ollama.
Why the command is not working
Your previous command has a flaw:
bash
docker run ... -v '/mnt/user/appdata/ollama':'/root/.ollama':'rw' -v '/mnt/user/ollama-models/':'/Models':'rw' ...
The OLLAMA_MODELS environment variable is not explicitly set. Ollama, by default, expects models to be in ~/.ollama/models (or /root/.ollama/models in the container).
Even if you set the OLLAMA_MODELS environment variable to /Models, you would still have a configuration split across two different locations. The ollama list command would show models in the /Models directory, but other Ollama files would remain in /root/.ollama, potentially leading to issues.
The correct and simplified approach
The most reliable method is to map the entire Ollama data directory (/root/.ollama) to a single host path on your Unraid server. This keeps all Ollama data—models, manifests, and configuration—together.
The corrected docker run command
To fix this, delete the current Ollama container in Unraid and create a new one using the following command. The command uses a single volume and correctly maps the necessary path.
-v '/mnt/user/ollama-models':'/root/.ollama':'rw': This is the critical line. It maps your chosen host path (/mnt/user/ollama-models) directly to the container’s default data directory (/root/.ollama).
OLLAMA_MODELS is no longer needed as an environment variable, as you are explicitly telling the container that /root/.ollama resides on your host server.
Steps to take
Remove the old container: Go to the Unraid Docker tab, click the Ollama icon, and select Remove.
Ensure host path exists: Make sure the /mnt/user/ollama-models directory exists and has the correct permissions (e.g., set to nobody:users with full read/write access).
Run the new command: In the Unraid Terminal or via the Unraid Docker interface, execute the corrected docker run command.
Pull a model: Once the container is up and running, pull a model.bashdocker exec ollama ollama pull nomic-embed-text:latest Use code with caution.
Verify: You can now check both inside the container and on your Unraid file system.
Inside container: Run docker exec ollama ls -la /root/.ollama/models. You will see the downloaded files.
On Unraid host: The files will be visible in /mnt/user/ollama-models/models on your Unraid server.
That worked and the /Models seems to be gone??? root@765a0a3f364d:/# ls -la total 16 drwxr-xr-x 1 root root 164 Oct 19 18:19 . drwxr-xr-x 1 root root 164 Oct 19 18:19 .. -rwxr-xr-x 1 root root 0 Oct 19 18:19 .dockerenv drwxrwxrwx 1 99 users 6 Oct 19 18:17 Models lrwxrwxrwx 1 root root 7 Apr 22 2024 bin -> usr/bin
Your new docker run command caused the /Models directory to disappear because you removed the volume mapping that created it in the first place. This is the correct and expected behavior.
Why /Models is gone
In your previous command, the line -v '/mnt/user/ollama-models/':'/Models':'rw' did two things:
It created a directory named /Models inside the Docker container.
It mapped that internal container directory to a directory on your Unraid server at /mnt/user/ollama-models.
In the corrected command, you removed that specific volume mapping. Therefore, Docker no longer creates or manages the /Models directory inside the new container. The container’s filesystem returns to its default state, which does not include a /Models directory.
Where your data is now
The corrected command uses a single volume mapping: -v '/mnt/user/ollama-models':'/root/.ollama':'rw'.
This maps the container’s default data directory (/root/.ollama) to your chosen host path (/mnt/user/ollama-models).
The ollama pull command now saves models to /root/.ollama/models inside the container.
Because of the volume mapping, those models are physically stored in /mnt/user/ollama-models/models on your Unraid server.
This unified approach is simpler and less prone to configuration errors. You should now find your models by checking the correct location on your Unraid server.
To verify on your Unraid server:
Open a terminal or access the Unraid console.
Navigate to your specified path: ls -la /mnt/user/ollama-models/models
You should see the llama3 and nomic-embed-text model files listed.
makes sense – what’s the risk to expose ollama to internet via reverse proxy?
Exposing your Ollama instance to the internet, even with a reverse proxy, introduces significant security risks that must be carefully managed
. The reverse proxy handles encryption (HTTPS) and can add a layer of authentication, but it does not fix Ollama’s inherent security model, which assumes a trusted network.
Core security risks
No native authentication: By default, Ollama lacks any built-in authentication, leaving its API open to anyone who can access it. A reverse proxy is used to add this critical feature, but if misconfigured, an attacker can bypass it.
API abuse: Ollama exposes an HTTP API with endpoints for pulling, pushing, and generating models. Without strong authentication, attackers can perform malicious actions, including:
Data leakage: Stealing proprietary or private models.
Resource consumption: Launching Denial-of-Service (DoS) attacks by spamming the generate or pull endpoints, consuming your server’s CPU, GPU, memory, and disk space.
Model tampering: Manipulating models through the API.
Vulnerabilities in Ollama: Like any software, Ollama can have vulnerabilities. In the past, versions have been found to have critical flaws, including Remote Code Execution (RCE) and path traversal exploits. An exposed server is a prime target for attackers to exploit these weaknesses.
System compromise: Exploits in Ollama, especially when running with root privileges inside a container, could allow attackers to gain control of the container and, in some cases, the entire host system, including your Unraid server.
Data breaches from model interaction: If your Ollama instance is processing sensitive information, such as from a chatbot tied to internal company documents or private data, an attacker could interact with the model to extract that data.
The role of a reverse proxy
A reverse proxy is a necessary part of a secure setup, but it does not eliminate all risks. A properly configured reverse proxy provides:
HTTPS encryption: Encrypts all traffic to and from your Ollama instance.
Authentication: Adds a layer of authentication (e.g., username/password or API key) to control access to the Ollama API.
Security hardening: Provides additional security features, such as rate limiting to prevent DoS attacks.
How to mitigate the risks
Use a reverse proxy with authentication: This is the most important step. Tools like Nginx Proxy Manager (easily installed via the Unraid Apps tab) allow you to add basic authentication or API key protection.
Keep Ollama updated: Regularly update your Ollama Docker container to patch any known vulnerabilities.
Use a strong authentication method: Use strong, unique passwords or, even better, a bearer token (API key) for programmatic access.
Implement IP whitelisting: If you only need to access Ollama from a limited number of static locations, configure your firewall or reverse proxy to only allow traffic from those specific IP addresses.
Restrict network access: If possible, restrict the reverse proxy to only be accessible via a Virtual Private Network (VPN).
Regularly monitor logs: Check your reverse proxy and Ollama logs for unusual activity and unauthorized access attempts.
Isolate the Docker container: Ensure your Docker network configuration is secure. Use a custom bridge network instead of the host network to contain the container and limit its network access to only what is necessary.
The architecture is pfSense/ACME Certs/haProxy/Unraid/Docker
Using pfSense, ACME certificates, and HAProxy to expose Ollama on Unraid is a robust and secure architecture, provided that each component is correctly configured
. The main goal is to use HAProxy to add a critical layer of authentication and encryption that Ollama lacks natively, protecting against unauthorized access and API abuse.
How the architecture components work together
ACME/pfSense: The ACME package on pfSense automates the process of obtaining and renewing free SSL/TLS certificates from Let’s Encrypt. This ensures that all public traffic to your Ollama instance is encrypted via HTTPS.
HAProxy/pfSense: HAProxy acts as the reverse proxy, sitting in front of your Unraid server. It terminates the incoming HTTPS connection from the public internet and forwards the traffic to your Ollama Docker container on your internal network.
Unraid/Docker: Your Ollama container runs securely within Unraid. Crucially, the container’s network should be configured to prevent direct access from the internet. Ollama should only be accessible on your local network (e.g., localhost or via a custom Docker network) and only from HAProxy.
Key security considerations for your architecture
1. Implement authentication in HAProxy
Ollama has no built-in authentication, so an unauthenticated API request to an exposed endpoint is a major security risk.
Add basic authentication: The simplest method is to use HAProxy’s built-in basic authentication (auth_basic). This requires a user to enter a username and password to access the Ollama API, which is a significant deterrent to casual attackers.
Integrate with a single sign-on (SSO) provider: For advanced security, integrate HAProxy with an SSO tool (like Authelia) for more robust authentication and user management.
2. Restrict internal network access
While HAProxy protects the public-facing side, it’s equally important to secure your internal network.
Use a custom Docker network: Create a custom Docker bridge network for Ollama and any other containers that need to talk to it. This isolates the Ollama container from the rest of your Unraid network, preventing other services from accessing it.
Bind Ollama to localhost: Configure the Ollama Docker container to only listen on localhost:11434 (127.0.0.1). This prevents any device on your local network (except for other containers on the same host) from communicating with Ollama directly, forcing all traffic to go through the authenticated HAProxy path.
3. Secure HAProxy configuration
HAProxy’s configuration is your last line of defense before your local network.
SSL termination: Configure HAProxy to use your ACME-issued certificates to terminate the SSL/TLS connection.
Secure forwarding: HAProxy can then forward the request to the Ollama container over a secure internal connection, or an insecure one, depending on your network design. While SSL termination is good, re-encrypting the traffic for internal forwarding offers an extra layer of protection, though it’s more complex to configure.
ACLs and rules: Create HAProxy rules to define what traffic is allowed. You can use Access Control Lists (ACLs) to perform checks, such as requiring authentication for certain API endpoints (generate, pull) but not for others.
4. Stay updated
The AI space moves quickly, and vulnerabilities are discovered regularly.
Update Ollama regularly: Ensure your Ollama Docker container is running the latest, patched version. The ollama/ollama team frequently releases security fixes.
Update pfSense and HAProxy: Regularly update your pfSense system and the HAProxy package to receive the latest security patches.
By following these steps, you can create a secure setup where your Ollama instance is only accessible via an encrypted, authenticated connection managed by your pfSense firewall.